Category Archives: Uncategorized

2.2.10 Database Option

The  system  adopts  Microsoft  ADO  database  interface,  default  single  Access2000  database,  filename  is  att2000.mdb,  and  you  can  set  up  database link according with real situation.  When  system  appear  following  error  prompt,  you  need  modify  you  database link setup

1

Connect Microsoft Access databases 
1)  Select  “Maintenance/Options”  menu,  click  Database  Option  sub­item, the following window pop­up

2

Chose  Provider  pagination,  then  select  Microsoft  Jet  4.0  OLE  dB  Provider;
2)  Click  “Next”  button  to  enter  next  step,  or  click  Connection pagination to enter following window:

3

Click “4” button, select database filename.

A: For a single computer

Through the pop­up menu of File Manager, attach it in the attendance  database  file.  The  default  file  path  is  C:\ProgramFiles\ZKTime5.0\Att2000.mdb Click  “Test  Connection”  button,  if  the  prompt  inform  you  the  connection is successful, that means that the software have been create  link between databases, shown as following figure:

5

User may use the password to guarantee databases security, if you do  not want to input password, please remove tick from “Blank password”,  put the tick in the password input box, click “OK” to enter next, Shown  as following figure

6

B: For a Network

For instance, three Time Attendance systems are linked together, with  their computers labeled with Computer1, Computer2, and Computer 3  respectively  and  Computer1  is  the  host.  First,  make  the  installation directory  of  the  attendance  system  on  Computer1  to  share  with  other  computer, and grant Computer2 and Computer3 to read­write and access  Computer1 is available. The Database link on Computer1 is pointed to  the local Time  Attendance  database, and  database link  on Computer2  and Computer3 is pointed to the database on Computer1. Thus the three  machines are able to share data.

Link to SQL Server

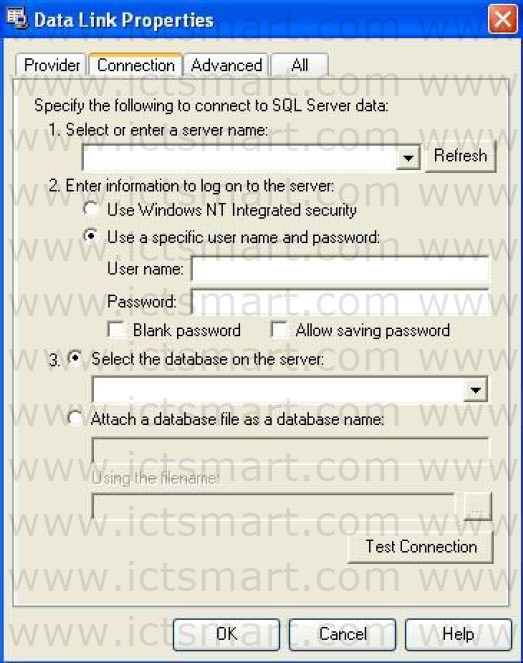
If  you  want to  use a network  database, first you should  establish the  Fingerprint Attendance System database on the database server. In the  installation directory of this Time Attendance system, you can find a file  with the name of sqlserver.sql, which is the SQL script for establishing  the Fingerprint Attendance System database on Microsoft SQL Server  7.0. If you are using other database server, please refer to this document  to establish the Fingerprint Attendance System database.  Provider  Select  Microsoft  OLE  DB  Provider  for  SQL  Server  click  “Next” button or click “Connection” pagination to enter the following  window:

7

Defined  Name  of  the  server  which  store  up  the  database  severs  information  and  database  you  login.  Click  “OK”  button  to  complete  setting

ย้อนกลับ กลับสู่เมนูหลัก ถัดไป

2.2.9 Attendance Rule

All attendance computation of statistical comply with attendance rule, 1. Select Maintenance/Options menu, click “Attendance rules” option,  and this window will popup:

1

This interface consists of four pagination pages;

It is required to set the beginning day for each week or the beginning  date for each month. Some companies calculate their attendance record  from  Sunday,  and  other  from  the  26th,  after  these  setup,  it  is  convenience for calculation to select time.

If a shift expires 0:00, it should be  defined which  workday  this shift  belong to.

How many minutes are the longest time zone no more than? How many  minutes is the shortest time zone no fewer than?

In  order  to  determine  attendance  status,  verify  record  correctly,  grant  smart schedule demanded, so that the least minutes of shift is not litter  than few minute. Otherwise the system will determine record as invalid

E.g. an interval of five minute, there is valid record at 8:10, so, among  8:10 between 8:15 records are invalid, it is valid record only after 8:15.

Out state:
There are four methods to be selected to handle leaving status

Ignore  the  state:  This  status  is  ignored  while  attendance  statistic  to  handle.

As Out: This out status is signed Normal out.

As Business Out: This status is sided on business out.

Audit  it:  make  verification  for  record  by  hand,  examine  employee  whether go out.

OT state
The over time consist of, counting over time, not counting over time,  administrator allowing and count over time, three status

Ignore the state: attendance statistic does not count over time;

As  OT  directly:  Over  time  does  not  need  to  be  examined,  count  it  directly:

Audit it: Make to verification for record by hand, in order to examine  whether employees have over time

Examine  operation (Audit it) is sub­item  which attendance  exception  require and record list other exception require.

2.  Click Calculation  pagination,  calculation window  appear,  show  as  below:

2

You need to set that the work hour account by minutes; this value should  be the same with on­duty hour, because statistics result correct depends  on this value.

In the step,  how  many  minutes will be recorded as coming late after  expire on­duty time, how many minute will be recorded as leaving early  before near off­duty, the definition of time period must be the same with  time period of the maintenance setup, otherwise the statistics result is  Not correct.

For the clock­in record, how many minute means coming late of neglect  work, for the clock­out record, how many minute means leaving early or  neglect work.

If you’re coming late or leaving early is over to definite minutes, there  will be regard as absent work

Can set overtime which are how many minutes it exceeds clock­off time,  so this will be record overtime.

It can restrict the max. overtime(OT) hours and total OT hours before or  after the on­duty time.

3. Click Statistic Item pagination, and following window will pop up:

3

You can set statistical rules and symbols for employee leave on business,  coming late and leaving early, etc, on the pagination label.

Freely over time (FOT): Over time work is not registered in schedule,
employee attendance is regard as freely overtime.

Note:  The  system  default  setup  only  qualify  with  attendance  situation which one day is divided into two Time Period, if one day  is divided into more than three parts for attendance, please select all  item and total them to ensure the accuracy of the calculation.

Group  by  time  periods:  This  item  will  define  whether  attendance  record  will  be  distributed  into  their  corresponding  shift  Time  Period.  E.g., select all items that are without clock­in item and group them, then  you will get the total of time without clock­in and clock­out item.

Acc. by times: Only count the times, how many times are to display  on the record list, No time record.

Round up: when the statistic data have point, the system will make after  point figure to carry upward as 1. For stance, the  min  unit is 1­work  hours,  so  that  the  calculation  result  of  1.1and  1.9­work  hour  will  be  record 2­work hour.

Round off: If the left value which after point figure excess 5, the value  add 1, otherwise the left value is abandon

Round Down: Abandon the value No matter how many it is. E.g. min unit is 1 work hour, so that the calculation result’s 1.1and 1.9  count as 1 work hours

4. Click the Weekend Set tab and the tab page appears as below.

4

Set  the  date  of  weekend  (for  instance,  the  weekends  of  different  countries are different) and the weekend display symbols and color in  the reports according to actual requirements.

Attendance calculation

The Attendance calculation page is the most frequently used page. It  can calculate the attendance data under a specified clock in/out rule and  generate the attendance situation into a report for view and settlement.

5

The  data  fields  in  the  attendance  statistical  report  include  Emp  No.,  AC­No., No., Name, Schedule, Auto­Assign, Date, Timetable, On duty,  Off duty, Clock In, Clock Out, Normal, Real time, Late, Early, Absent,  OT Time, Work Time, Exception, Must C/In, Must C/Out, Department,  NDays, WeekEnd, Holiday, ATT_Time, Ndays_OT, WeekEnd_OT, and  Holiday_OT.  To  select  more  items,  right­click  the  list  and  select  “Column” from the context menu. All available options appear and the  ticked off items are selected fields.


ย้อนกลับ กลับสู่เมนูหลัก ถัดไป

2.2.8 Leave Setting

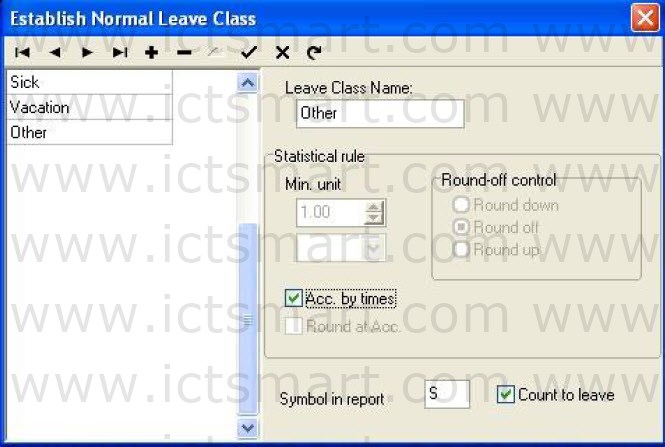
It is possible that when employee encounters the serious problem and  needs to ask for leave, cause the different reason, asking for leave can be  automatic statistic in the system. This system  provides with the leave  kind  of  maintenance  function,  click “Leaving  Class”  in  down­drag  menu, following window pop up.

6

The  system  provides  three  kinds  of  ordinary  default  leave:  Sick,  Vacation, Other, they can be deleted and edited. Click “2“button to  add the new common kind of leave.

Add: Click “2“button to add the new common kind. In the right side  module  may  define  Leave  Class  Name,  Statistical  rule,  and  performance  way  of  this  leaves in  the  report and  whether  counts  for  asking for leave. After filling this blank, click “3”  button to save, or  click button to abandon current operation.  While this process, the information which needs to add as follows:
Leave Class Name:A name which takes for this kind of leave.

Statistical  rule:  The  certain  rule  in  the  Time  Attendance  report  for  counting the leave.

The kind of leave statistics rule: Min­unit, Round off control, Acc. By  times, Round at Acc.

The  min­unit  is  the  smallest  unit  of  measurement  for  leave.  The  common unit is Workday, Hour, Minute; there are several kinds of units  of measurement in the working day. Shown as following figure.

5

The Round­off control refers to if the hour of the leaves is not integer  in the attendance report while we calculate Time Attendance record , in  order  to  get convenience  in  the  computation  of  the  Time  Attendance  statistics,  provides  with  one  computing  mode.  Round  up,  round  off,  Round down.

Acc. by times refers to this leaves statistics way in the Time Attendance  report: The employee asks for leave in a period of time by the number of  times which asking for leave takes the computing mode. If chooses this  option, then the computation of the Time Attendance calculation does  not comply with min­unit and the round control in the statistical rule.  Shown as following figure

6

Round at Acc is to accumulate all time of this project and converts it  into the  corresponding statistical unit, then  depending  on the smallest  unit to setup the method for rounding off.

Symbol  in  report  is  the  symbolic  representation  way  of  this  leaves  appears in the report while print report.

Count  to  leave  refers  whether  set  this  leaves  for  asks  for  leave.  Attention, if  put tick in this  option, then the  date  of asking for leave  which is newly added will statistic as the asking for leave in the this leave computation of Time Attendance report.

Deletion: Be allowed to delete a leaves. Selects a leave name which needs to be deleted, click button to delete it.

Edit: Edit leaves. Select the leave name which needs to edit, click  “8” button; modify the leave in the right side frame.


ย้อนกลับ กลับสู่เมนูหลัก ถัดไป

2.2.7 Holidays Maintenances

In the legal holiday, according to the related laws and regulations the  employee will take the leave, the employee will be unable to Attendance  for this period, in usually situation, if employee has not checked record,  these employee will be regard as absent from work without an excuse by  the system, moreover also the employee holiday working overtime will  be unable to take effective in the computation, according to this kind of  situation  properly  set  management  system.  Choose  the  Holiday  List  sub­item  under  Maintenance/Options  menu,  opens  the  Holiday  List  maintenance window, show as below:

1

This  interface  is  mainly  divided  into  the  Holiday  List  and  tool  column  option  of  the  Holiday  List  maintenance.  May  add,  delete,  and modify the Holiday List through maintenance tool column.

Add: Click  “2“button, a blank which is used to add information appears in  the  holiday  list  module.  Input the Holiday  Name,  the  Holiday  Time,  and  the  Holiday  Length  into  the  corresponding  blank. Following figure:

3

Note: when input holiday time, the format you input is 01/01/11,  after input, the default format 1/1/2011.

After correctly input the information that wants to be added, click  “4“button to save this information.

Delete:  Click”5”   button  to  delete  the  holiday  information  which does not need to use.

Edit: When need to adjust to the holiday time which has been added,may click  button”6“, to edit holiday information. Then click “4“button to save the information which has been edited. After adding the holiday list, while assign employee shift, the system  cannot schedule these Timetable. Because assign employee shift record  does  not  exist,  therefore,  set  holiday  period,  in  the  Time  Attendance  report  form,  the  system  cannot  count  this  period  of  time  the  Time  Attendance. If in holiday period had the employee to carry on the Time  Attendance registration, counted in the Time Attendance report form for  this employee freely working overtime


ย้อนกลับ กลับสู่เมนูหลัก ถัดไป

2.2.6 Employee Schedule

If employee has not been scheduled, then at finally system is unable to  statistic the Time Attendance records, if a employee did not belong to  shift  the  system    will  be  unable  to  distinguish  his  Time  Attendance  record which was goes to work or gets off work, and fail to count his  Time Attendance.
After  setting  the  Timetable  and  the  Shift  Management,  Select  Maintenance/Options  menu,  click  “Employee  Schedule“,  open  the  window  of  Schedule  Employee’s  AC  Here,  you  can  maintain  data  related to employee’s shifts.

1

Left side of the page demonstrates that shift schedule depending on the  department.  Click  department  name  with  mouse,  can  show  all  employees and its Shift Schedule in the right side employee module.

1. Assign Employee Shift by department 
According  to  the  different  department’s  characteristic  to  assign employee shift, Single­click Department Schedule button  on the left angle, the following dialog box appears

Default  schedule:  Select  a  shift  from  down­drag  menu,  make  it  as  default Shift which is used for enrolling new employee, after enrolling  new employee it will give new employee a shift.

May used schedules: Able to display name of current setup shift in the shift  schedule  list,  when  arrange  department  shift,  the  shift  will  not  display list until selected shift.

2. Normal Assign employee Shift 

The part of the page in right side is the assignment employee shift the  module. Assign employee shift not only individual all, but also by the  batch.  Click  “all  choice”  button  to  assign  all  employees  shift.  in  the  employee’s list interface, hold down the “Ctrl” key and with the mouse  single­click the employee to complete the  multiple­choice, choose the  employee  who  needs  to  be  assigned  to  shift  ,then  click  Arrange Employee’s  shifts  button  “2“,  the  following  interface appears:

12

Clock in/out: May set whether employee has to Clock in/out, according  to the corresponding time Period to judge whether need to  Clock in/out the setting privilege in this project is higher than one in Shift Timetable  setting.

Attendance Active: Refers whether Time Attendance is effective or not,  after choosing this item, according to the Time Attendance rule and the  shift schedule, total of Time Attendance record is available, otherwise,  this employee will not participate in Time Attendance,  whose records  regard as normal work. For example some leaders do not need to count  the Time Attendance for normally go to work.

Count OT: After choosing this item, ability to calculate this employee’s  working overtime.

Holiday: After choosing this item, this time the employee who has been  assigned shift will rest in the holiday, if he/she will go to work, his/her  record  will  regard  as  working  overtime,  otherwise,  this  time  the  employee who has been assigned shift have to go to work in the holiday,  if he/she does not go to work, his/her record will regard as absence from  work without an excuse records.

Registry for OT: Refers to employee’s all working overtime which is  this time to assign employee shift must pass through the registration or  the verification only ,then it take effective.

In current arrange shift under the option to be allowed to examine this  employee’s  entire  shift,  may  add  and  delete  change  employee’s  shift.
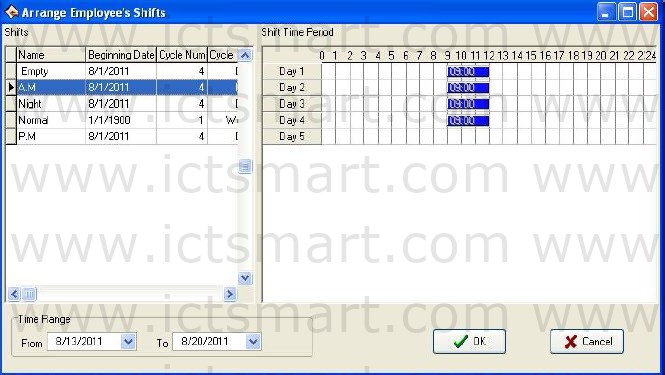
Click  “6“add key, the following interface appear:

7

All shifts and the shift Timetable display in  this interface. Chooses a  new  shift  from  these  shifts  which  have  been  set,  determine  its  Time  Range, single­click “OK” button to confirm the operation, single­click  “Cancel” button to give up operation, returns to the Arrange Employee  Shifts window. After arranges successfully, the corresponding shift name  will display in employee’s shift column, and time list can show on­duty  Time Period in the interface.

While a employee shift in Normal work hours, you can add a lot of item  of schedule. E.G.:
Starting date  stopping date                    shift
03­3­1                    03­5­30                      springs
03­6­1                    03­9­1                        summers

3. Auto­ assign timetable 
If  assignment  employee  shifts  or  changing  shifts  schedule  is  too  frequently, and there is not the rule to follow, auto­ assigning employee  shifts is available, auto­ assign employee shift refers to employee does  not has fixed shift schedule in the definite time, but he /she has the Time  Attendance record, the system may automatically judge the Time Period  which  record  belong  to.  After  choosing  the  auto­assigning  employee  shift, the following interface appears:

The auto­assignment employee’s shift function is that, while employee  who  does  not  assign  shift  to  Time  Period,  but  he/she  has  attendance  record, the system will can define automatically the Time Period. This  function main use in more changes shifts.

Least time for Auto­assign: Choose the least time for auto­assign, the  least time for auto­assign employee shifts refer to after you have set the  time,  for  instance  1  day,  the  system  only  could  not  carry  on  the judgment by the shift Time Period until the time which the employee  has not arranged in groups is more than 1 day, otherwise did not judge.

Used  timetable: This  employee  possibly shift  Timetable,  single­click”9“button, the choice shift Timetable appears, these shift Timetable are the name list of the set shift which have already been set in shift  management. Interface as follows Left­click  shift  names  that  select  from  display  shift  name  list  add  selected shift. If want to cancel shift where there are used period of time, first define  period  of  time,  click  on  button, it  will be canceled.  Show below:

After set up, click on “OK” to save setup, click on “Cancel” to give up  action, return attendance setting label

4. Employee temporary shifts
If  one  (or  several)  employee  needs  to  change  his/her  work  hours  temporarily, his/her shift can be arranged temporarily. Select employee,  if  you  want to  select a  lot  of  employees,  can  hold  down  “Ctrl”  key,  simultaneously click employee or use all choice button, click Employee temporary  arrangement button”13 “,  pop  up  dialog  box, win dow is following:

14

Click  “OK”  button,  enter  temporary schedule,  click  “Cancel”  button,  return Schedule Employee’s AC window. First definite schedule hour,then  click  on  Add  Time  Period  button”15”  ,  popup  the  following window:

16

Select shift category for this time period on the window of Add Shift  Time Period, and select data for adding this  period. The  operation
method is the same in Maintenance Shift Schedules to add period of  time.  Click  “OK”  button,  to  save Time  Period  or  click  “Cancel”  to  cancel the action. If select Night (20:00­06:00), select all day, then click  “OK” button to save, and return Schedule Employee’s AC window. The  temporarily  schedule  will  appear  in  the  shift  schedule  list.  Show  as  below:

17

Before  saving  this  Temporary  Shift,  be  allowed  to  select  the  Time Period, press  “19“key to delete it, Press button to delete all Time Periods, click  button to save it. If this temporary shift you add  have  been  saved,  press    button  to  cancel  temporary  shifts during this period.

5. Shift schedule regularly change

There shift schedule regularly change that exist in most company, how  to arrange the shift schedule regularly change, To handle various Shift  schedule regularly change is a software’s strong function.

Here ,illustrate change shift method with four shifts three times change a  week, example ,there are A, B, C, D four shifts, working hours schedule  are divided into, a.m shift, p.m shift, night shift, three  Timetable, the  application  beginning  date  is  1.  As  before  instruction  finish  the  operation, the following window appear

22

Employee working hours schedule list:

23

From  schedule  list,  the  regular  are  fund,  cycle  of  all  employee  work  hour is four day. so, A, B, C, D four shifts’ s four day working hours are  divided into four shifts. Other shift follows the instruction.

24

Time Range: Refers to show all employees schedule time  which day  start, and which day end Timetable in the below rolling region.


ย้อนกลับ กลับสู่เมนูหลัก ถัดไป

2.2.5 Management Shift Schedules

After  setting  Timetable,  Be  able  to  set  Shift  Schedule,  Select  “Maintenance/Options” menu, click “Management Shift Schedules” sub­-item, and then you can enter shift menu with the following window:

1

This interface may be divided into Shift name and Shift Timetable, the  Shift name box include Shift Name, Shift Beginning Data, Shift Cycle Num, Shift Cycle Unit.

Name: The shift name can’t be repeated, and all the fields in the form can’t be empty.

Beginning  Data:  Application  Beginning  Date  is  in  the  form  of  yyyy­mm­dd,  for  example,  November  the  15 th ,  2003  is  recorded  as  2003­-11-­15, and March the 6 th , 2003 is recorded as 2003­-03-­06.

Cycle Num: Shift cycling periodicity = Cycle Num * Cycle Unit.

Cycle Unit: Cycle unit consist of day, week, months

Shift Management Tool Bar to add,  cancel, modify shift. Under the
status of adding or editing shifts (when “2” button is valid), you
may Add/Edit/Delete Shift Time Periods.

Add: Single­click “3“button to add a new Shift, the blank
Shift Timetable will appear in the right side, then click “4
button, following window will pop up:

5

Select a Timetable which has been setup in down­drag menu, add shift  Timetable directly. Which day are you on duty, you make a mark  on  the day you selected. At same time sign the day as over time or not, then  click “OK” button to save setup, click on “Cancel” button to give up the  action.
Delete Shift: Choose a Shift that want to be deleted, click”6” button to delete.

Edit: Choose a Shift that want to be edited, click  “2“to edit.

Delete  Time  Period:  Click  on  “6” button,  selected  Time Period will be deleted.
Save: After a Shift has been edited or added, click “8“button tosave related information.


ย้อนกลับ กลับสู่เมนูหลัก ถัดไป

2.2.4 Maintenance Timetables

Before Maintenance Shift Schedules, the Timetables must be set up to complete, select “Maintenance/Options” menu, click on the ” Maintenance Timetables” in the main menu, can set Timetable which is used to arrange employees shift, the interface is following
1If you has not set the shift schedule while set the Timetable, the system  will auto-­prompt you should go on shift scheduled management setting,  shown as following figure.
2A. Click “Cancel” button, return main menu windows
3B.  Click  on  “OK”  button,  start  to  set  Time  Period,  the  window  is  following.
4Setting the On/Off duty times in this organization, follow the guide to  set Timetable and shift schedule.

According to the company real condition, the method of onduty and offduty is selected, is twice attendance (On duty in morning. Off duty in afternoon.), or is four times (On duty and Off duty in morning and afternoon.), input correspond to onduty and offduty time, click “Cancel” button, return main windows click “Next” button to continue setting.

If chose twice attendance, click “Next” button to continue setting, the window is following.
5This windows may set the beginning times for C/In and C/Out, definite  the time range of clock­in(C/In) and clock­out(C/Out), and whether at  this time employee must be C/In and C/Out, if want to select this item,  just put tick in the selection box, also can set different option depending  on  different  department  and  employee,  click  “Next”  the  window  is  following
6On the window, set regard as coming lately time and regard as leaving  early time, click on “Next” button to enter next window.
7On the window, the system prompt that it will add a timetable named  “Daytime” and a shift schedule named “Normal”. If before operation  had  chosen  “On  duty  and  Off  duty  in  morning  and  afternoon”.  System will add two new Timetables; each is “A.M” and “P.M”. There  are three options on the window, according to need to select, and then  click on “Finish” button, and complete setup. User can chose “Assign  this schedule shift to employees who has not assigned any schedule”  or  “Assign  this  shift  schedule  to  ever  department  as  default  schedule”,  click  on  “Finish”  button,  enter  period  of Shift  Timetable  Maintenance window.
8The Shift Timetable Maintenance interface may be divided into two parts, left part mainly are the Shifts Timetable list, right side is the Shift Timetable management. May add, delete,and revise Shift Timetable.

Add: Singleclick “Add” button to add a new Timetable, then input the Timetable name, On Duty Time/Off Duty Time, recording the time as coming lately (Late Time (Mins)), recording the time as leaves early (Leave Early Time (Mins)), etc. The Time Attendance record is the effective record only within the hour of Clocking in/out; take these recording as standard to statistics logs. Simultaneously definite this Timetable, whether employee must Clock in/out or not. The input time format is hh:mm, which separately corresponds the hour, the minute.

Delete:  Selects the Timetable which has already existed, singleclick “Delete” button to delete the Timetable which has been selected.

Save: Singleclick “Save” to renew, when revised or add a Timetable, clicks this button to save the Timetable setting information.

The field of meaning in Timetable settings
Late Time (Mins): As above figure show, the setting value is 5 minutes,  Illustration’s On  Duty  Time  is  09:00. E.g.  A.  Clock  In  at 09: 03,  B.  Clock In at 09: 07, so the A is not coming late, because he check­in time  is not over 5  minute, the B is coming late  for 7  minutes, because he  check­in time is over for 2 minute.
Leave Early Time (Mins): It is the same as Late Time, depend on the  difference between the clocking out time and the Off Duty Time.
Beginning  /Ending  In:  Must  input.  Within  check­in  range  of  This  Timetable  the  record  regard  as  validity,  outside  this  scope  checking  record is the invalid record.
Beginning/Ending  out:  Must  input.  Within  check­in  range  of  This  Timetable  the  record  regard  as  validity,  outside  this  scope  checking  record is the invalid record. Begin and End Clocking out time can not  overlay.
Count  as  workday:  Refers  to  each  Shift  record  how  many  working  days, if here the value has been set, the program will defer to the setting  value to statistics working day, otherwise according to Time Attendance  rule in option statistics.
Count as minute: The period of this Timetable will be recorded how  long time in the Report, may set it by user. For example: a Timetable’s  reality length is 9 hours, may record it as 8 hours, also records in the  Report this Timetable is 8 hours.
Must C/In and Must C/Out: According to the different post and the  different request may definite the Shift Timetable whether has to check  out/in.
Change  the  Display Color: May change  each Shift  Timetable color,  used to differentiate each different Shift. Just left­click the color with the  mouse, the color will be modified.


ย้อนกลับ กลับสู่เมนูหลัก ถัดไป


2.2.3 Administrator Setting 

1. Set administrator
 To  help  protect  you  system  from  security,  to  prevent  the  data  are  changed by unauthorized personnel, this management program provide  with the function to set administrator.
(1).  Click  the  Administrator  sub­item  on  the  menu  of Maintenance/Options,  this  window  will  pop  up,  show  as  following  dialog box

1

(2). Click on the “Administrator” button, the display is following:

2

(3). Select the administrator type  you want to add (it is better to add  supper administrator first), after click, following interface appear.

3

Choose the administrator you want to add in the interface, all administer  must be the company’s employee.

4

(4).  Administrator’s  initial  password  is  himself/herself  AC­No,  click  “OK”  to  enter  the  administrator  privilege  interface,  may  set  this  administrator is allowed to software    in this interface    be allowed to  software.

5

5). Single­click each item of front selection box , this item is able to  switch    from  select  to  unselect,6  indicated  this  item  has  been  selected,  unselect  all  express  that  the  system  give  each  kind  of  administrator privilege by default setting. After selecting, click “OK” to  complete the setting, if click “Cancel” to be allowed to set the privilege  in  the  next  time  again  (select  the  one  which  will  have  to  revise  in  administrator interface, click “Operation Purview” button to reset). For  more detail please see Items that can be authorized.

Noteadministrator is unable to revise own privilege, delete oneself,
only the upper of administrators is allowed to revise, add or delete  next level of administrators. Be unable to change the privilege or  cancel the administrator unless when there is only an administrator. 

(6). Click “Modify Password” button, pop up window as shown below.

7
Old Password: Input old password.
New Password: Input new password.
Verify  New  Password:  The  input  must  be  consistent  with  the  new  password.

(7).  The  system  default  administrator’s  password  is  this  employee’s  AC­No,  it  is  better  to  revises  the  individual  password  to  guarantee  system data security. After the administrator has been set in the system,  the Login window will appear, unable to enter the system until input the  right User Name and Password.

8

2. Administrator’s privilege and classification

(1). Administrators’ classifications 
There are four kinds of administrators in the system, depending on the  privilege  height  Sequence:  Super  Administrator,  Department  Administrator,  Level  1  of  Dep.  administrator,  Level  2  Dep.  Administrator.

(2). Administrator’s privilege:
The  Super  Administrator  may  manage  all  employees;  the  Department  Administrator  only  can  manage  this  department  employee.

Super  Administrator:  The  super  administrator  is  highest  level  of  administrators in the system, the super administrator own  privilege to  add,  revise,  delete  administrator  besides  oneself,  it  is  allowed  to initialize the management system and set the database. His/her default  privilege is allowed do any operation for the system. If unselect all in  the interface of Set Administrator’s Purview, then the default privilege  will  be  used;  If    only  several  items  has  been  selected,  then  this  administrator  who  has  the  operation  privilege  can  select  the  corresponding project only.

Level 2 Dep. Administrator: Level 2 Dep. administrator is allowed to  add    this  department  administrator,  and  same  level  perhaps  the  low  level of administrators    revise privilege, delete this department besides  oneself,  who  is  not  allowed  to  operate  other  departments’  any  administrators.  If  only  several  items  have  been  selected,  then  this  administrator,  who  has  the  operation  privilege,  only  can  select  the  corresponding project.

Level 1 Dep. Administrator: Level 1 Dep. Administrator may add this  department  administrator,  and  same  level  perhaps  the  low  level  of  administrators revise  privilege, delete this department besides oneself,  who is not    allowed to operate other departments’ any administrators. If  several items have been selected, then this administrator, who has the  operation privilege, can select the corresponding project only.

Department administrator: The department administrator may add this  department  administrator  and  the  same  level  administrator  revise  privilege, delete this department in besides oneself, who is not allowed  to operate other departments’ administrators. If several items has been  select, then this administrator, who has the operation privilege to select  the corresponding project only.

3. Items that can be authorized

Clear Obsolete Data/Backup Database/Export AC Data: There are 3  projects under the Data menu, the administrator own this privilege to  save and examine the data.

Import AC Data: It is able to import recording data in the file to the  system through Import AC Data under the Data menu.

Employee  leaving  on  business/Asking  for Leave: Click  “Employee  leaving  on  business/Asking  for  leave”  sub­item  under  Attendance  menu,  may  set  the  employee  leave  on  business  /  asking  for  leave  condition, and produce the corresponding data sheet.

Forgetting to clock in /out: If the employee forget to clock in/out, add  clock in/out record for this employee. Through Forgetting to clock in  /out sub­item under Attendance menu.

Coming  Late  Collectively:  If  employee  have  forget  collectively  to  clock­in/out, then neglects assigned time clock­in/out record, or add the  clock­in/out record again this sub­item under Attendance menu.

Attendance  record:  May  search  employee’s  attendance  record  and  revises the diary through this sub­item under Search/Print menu.

Current  Employee’s  On­Duty  Status:  May  search  the  employee  current time in the At­post/not At­post situation through Sub­item.

Attendance Calculating and Reports: Under Search/Print menu, also  may click on “Report” icon to enter, may inquire each kind of exception,  statistics the Time Attendance, produce report, and print the report.

Department List/Employee Maintenance: May set the department in the  department  management;  revises  the  employee  information  and  employee’s  Time  Attendance  setting  in  the  Employee  maintenance  through sub­item Department list/ Employee maintenance under the  Maintenance/Options menu.

Administrator:  Under  the  Maintenance/Options  menu,  set  up  the  administrator and assign the privilege.

Maintenance  Timetables/Maintenance  Shift  Schedules:  Click  this  sub­item  under  the  Maintenance/Options  menu,  create  the  working  Timetable in the Maintenance Timetables, manages the shift schedule,  chooses  properly  working  timetable  or  the  timetable  combines  to  establish the different shift schedule.

Employee  Schedule:  Under  the  Maintenance/Options  menu,  assign  the Shift Schedule which already set to employee.

Holiday List: Set the holiday under the Maintenance/Options menu.

Leave Class: Under the Maintenance/Options  menu,  go  on a leaves  setting, and leaves statistical rule in report form.

Attendance  Rule: Set up the  Attendance rule, and statistical rule  for  Attendance project in report.

Database Option: Set up the database connection through this sub­item  under the Maintenance/Options menu.

System Option: Be able to carry on the setting to software some options  under the Maintenance/Options menu.

Connect: Be able to connect with Device through this sub­item under  the Device Management menu.

Download attendance logs: To download the data record is available  through the Device Management menu.

Upload  user  info  and  FP:  Ability  to  upload  the  user  information  through the Device Management menu.
Downloads user info and FP: Under the Device management menu,  can download the user fingerprint information.

Delete  AC  Log: eliminates  the  Time  Attendance  data  recording  in  machine through sub­item Delete AC log under the Device management  menu.

AC Manage: Be able to examine the Device information and carries on  some operations to the Device through this menu.

Device/Del  Device:  Can  add,  delete,  and  revise  the  Device  the  communication  information  through  this  sub­item  under  the  Device  Management menu

Sync  Device:  Synchronize  Device  time  with  Computer  time  through  Under Device Management menu.


ย้อนกลับ กลับสู่เมนูหลัก ถัดไป


2.2.2 Employee Maintain

Select the “Maintenance/Setup“, click Employee Maintenance item,  open  “Employee  list“,  within  this  window,  maintenance  employee’s various information and attendance setting. Through the employee list  you can view the department the employee belongs to, here to view and  modify employee’s information is available, at here attendance setting  privilege is superior to Assign Employee Schedule.

1

The window of Employee List divided into two parts.  1. The upper half part is employee list, list columns show employees all  information,  including  the  registration  number  (AC­No.),  name,  title,  No., Finger Count V9.0, Finger Count V10.0 and so on. The 9.0 and  10.0 are the algorithm version number. The bottom of the employee list  has a line of statistics; the statistics of each column corresponds to the  sum of the values. The first column show total number about employee.

2.  The  lower  half  part  is  the  currently  selected  employee’s  various  information and can be modified, Have three paginations, click the page  tag at the bottom can enter different page.  User can use Search function to search employee when the employee are excessive. Input query condition into the box, click “Search” button  to see the result.
Note: Click each column name can sort list by it.

1. Employee Maintenance Must  fill  the  blank  of  the  employee’s  information  list  with  the  employee’s name, enrolling number, according to the actual need you  can add other information about employee.
Note:  it  is  different  with  old  software,  we  have  increased  a  new  function in Maintenance/Options item , the User number distinguish  from enrolling number, the enrolling number is suit for Device, and  according to normal Device, the enrolling number don’t more than  65535 ,but the user number have not limit to its size number.
1). Addition New Employee 
When  usual  execute  this  management  program  at  first  time,  after  registering the user in the Device, than directly downloads it to software,  and revise name, as well as save it, upload it the machine to use again.
If have to directly add the employee in software, in order to guarantee  the  user  information  and  the  fingerprint  or  the  card    one  to  one  correspondences, connect with Device to go on the real­time registration  fingerprint and the card is available in this interface. After connects the  Device,  every  time  while  add  a  employee  the  corresponding  person’s  fingerprint  or  the  card  will  be  registered  simultaneously.  Avoids  the  trouble  which  the  fingerprint  or  the  card  and  the  personnel  does  not  correspond appears.

A. registration fingerprint
Fingerprint  device
:  Register  the  fingerprint  with  the  standalone  fingerprint Machine.
Under in “Fingerprint manage” drag­down box, choose the fingerprint  device that have attached to system, after connects successfully, starts to  add the employee. Select the department which the employee is at, after  click  ”  ”  button,  input  employee’s  register  number,  name  and  other  related information. Single­click “register” button to start the fingerprint  registration.
Sensor: Register the fingerprint through the on­line fingerprint device to  t.
Attention: when you choose fingerprint sensor to enroll, there are two
choice: ZkFinger9.0 and ZkFinger10.0, for the operation detail refer to Appendices 3.8 How to Generate License Files.
Sensor Registration flow:
Single­click “Enroll” button, shown as figure:

Start to register, click any finger in the interface with the  mouse, the  fingerprint Device that has been connecting with is in the registration  condition:

Attention: You can choose to enroll duress fingerprint, but it is only effect when the device supports the function, otherwise it is just a general fingerprint.

Follow  prompts  or  press fingerprint  on  sensor  face  of  the  fingerprint  device  or  fingerprint scanner,  after  press 3  times, prompt inform  you  registers  successfully,  then  fingerprint  registration  finish.  If  want  to  backup  fingerprint for system,  chooses a finger registration. After the  registration complete, press “OK” to return add the employee interface,  continue to add the employee.

B.  Registration card
Under  “Fingerprint  device”  drag­box,  choose  the  Device  with  radio  frequency card function, after connects successfully, and starts to add  the employee. Selects department which the employee is at, Click ” 2”  button,  wave  the  card  which  want  to  be  registered  on  the  radio  frequency card machine, after waving the card, this employee’s register number  and  the  card  number  can  display  the  corresponding  card  the  information,  according  to  needs  to  change  the  serial  number  and  the  name, the card  number  do  not change at random.  The  card number’s  length is 10. The cursor locates in the name column.

5

If want to add  new employee, press ”  ” button to repeat above  this  operation.

2)Add Batch Employees:  When  some  departments  enroll  a  lot  of  employee,  you  can  use  this  function  to  add  employees,  lighten  an  operator  work.  E.g.,  a  lot  of  employees want to be added to the FAE  department, first select FAE  department;  click  on  the  “Add  batch  employees”  button,  the  adding  batch employees’ window appears.
A. If there are not employees in this department, the following appear
6

B. If there are employees in the department, the following appear
7

The  backup  data  of  employees  witch  select  from  FAE  department  display on the left­up corner, if the new added employees and selected  employees own the same the shift and attendance setup, left­click “Copy  selected employee att options and schedule“, if there are other same  field, select relating to fields from the Select fields to be copied list. AC­No  batch  increase  that  department  on  adding  batch  employee.  Through the “*” Number pattern, it is easy to add employee’s AC­No.
Number  pattern:  That  means  AC­No’s  format,  for  example,  the  employee’s AC­No of this department is the figure 1 at the first, and its  pattern is 1***, input 1″*” to the Number pattern box, and input 3 to  the Wildcard “(*)” length box. The window display following:

8

Wildcard “(*)” length: That is  mean, how  many  figure the Number  pattern has. E.g. the forward section of the AC­No is 1***, its Wildcard “(*)” length is 3, if the AC­No is 1**, so its Wildcard “(*)” length is 2.  After the Wildcard “(*)” length has been defined; by use the “From”  box, “To” box to create AC­No range. E.g. create the AC­No range from  106 to118; input 6 to “From” box, import 18 to “To” box, the Wildcard  “(*)” length is 2, but from 6 to 9 width is one figure. At this condition,  the system will add zero automatically. Shown as following interface:

9

Click on the “OK” button, add employees, and click on the “Cancel”  button, return the Employee List interface.

3)Modify Employee
Do not modify Employee’s AC­No. Avoid there information don’t match  corresponding  information  in  the  Device.  Select  the  employee,  enter  new data in the corresponding input box, and then press “Save” button  to save.

4)Transfer Employee
Click  the  ”  10”  button  to  transfer  employees  from  one  department  to another department and this dialog box will pop­up

11jm8u

In  the  box  of  Fold  Department  select  the  department  to  add  new  employee in, and click “OK” to transfer

5) Employee’s layoff 
Some employees may remain in the company, but who don’t belong to  any department now, which is similar to the currently quite popularized  lay­off  phenomenon.  Leaving­post  employees  can  be  re­employed through  Employ  Employee  in  Department  Management.  Click  ” 12 ” button to present this dialog box the employee, or “Cancel” to  cancel this action.

13

Press “Yes” button to layoff the employee, or press “No” to abandon this  action.

6) Import user data
Import user data from the local disk.

Click “  14“ button, and the Import User Data interface pops up.
15

Click Import button, then the Import data wizard interface pops up.  Then, add the user data stored in the local disk.

16

7) Face group 

To use a face device and enter a face group, proceed as follows: Click  “ 17“,  and  select  the  users  who  have  registered  faces  for grouping.  For  the  users  who  have  not  registered  any  face,  do  not  perform this operation.

2. Right shortcuts key operation 

Right  click  a  region  of  the  Employee  List  to  Export  Data  (export  employee’s basic information), production report is available; entire rank  data also can be hideaway or showed in the current interface. Shown as  following figure:

Export  Data:  Export  all  employees’  information  of  the  current  department. Operation step like as Time Attendance port.
Create report for current grid: All employees’ information in current  department will display by report form. The operating method likes to  export the data in Time Attendance report.
Save Grid layout: After change setting of data rank, save the data rank  setting, it is allowed to use after through directly write down the data  rank setting.
Show all columns: After click this option, employee’s all information  appears.
Hide all columns: After using this option, employee’s all information  will be hided.  Columns: Show the name of composition rank of employee information  in the employee view. Move the cursor to the columns of the data, as  shown in the diagram below the drop­down menu popup:

As shown in the figure, the drop­down menu to display is the employee  of all field information, the user can click the appropriate field tick show,  do not hit the hook is not displayed.
3.  Click  Department  setting  button  “ 21“,  it  is  allowed  to  set  the department  setting.  Its  method  is  the  same  with  the  operation  in  department management.
4. Click the pagination label of Addition. The windows will appear asfollow:

22

Addition  page  can  enter  the  employee  is  more  important  related  information, select department, selected employee, in the field column  input information content input column type, content, and then save the  input information can be.

5. AC Options (Attendance rule option)

Click the pagination label of AC Options. The windows will appear as  follow figure:

23

Active AC: The item means weather the attendance is valid, if this item  is defined, the employee will be accounted and statistic attendance in  accordance  with  the  attendance  rule  and  other  select item,  otherwise,  this employee doesn’t need to keep the attendance record, and regard his  record as normal on­duty, E.g. A leader of the department doesn’t go to  attendance, but his attendance is accounted on normal duty.
Count OT: Sign this item, counted by the employee over time.
Reset on Holidays: Sign  this item,  the employee will have a rest on  holiday,  if  the  employee  is  on  duty,  it  will  be  signed  to  over  time.  Otherwise, the employees have to be on duty, if the employee is off duty,  he will be accounted to absent.
Check  Clock  In/  Check  Clock  Out:  This  item  can  control  the  employee must check­in or check­out, the setup privilege in the item is  super than it in the shift schedule.

Employee Time Attendance setting

Click “ 24“ button; enter employee’s Time Attendance setting widows, shown as following widows

25

The  operation  is  same  as  2.2.6  Employee  Schedule.  Here  not  restatement.


ย้อนกลับ กลับสู่เมนูหลัก ถัดไป


2.2.1 Department Management 

This  module  provide  with  convenient  to  manage  each  department,mainly  add,  cancel  department,  enroll  employee,  for  more  detail  as  following Click on the “Department list” sub­item  on the  menu “Maintenance  /Setup“, the windows appear:

In adding department, you first left­click the superior department of the  new  department,  click  on  the  “Add”  button,  input  the  name  of  new  department in the dialog box, click “OK” to save.

In  deleting  department,  you  only  firstly  left­click  the  department  selected,  click  the  “Delete”  button,  and  select  “Yes”  in  the  display  caution box, OK. If you want to  modify a  department’s subordination relationship,  first  selected the department to modify by left­click, hold, and drag the name  within  the  new  superior  department.  Then  follow  the  instruction  to  operate. Click on the “Employeed’ button. The following appear

Employees  in the Employees  list  are  those  who  don’t  belong  to  any  department, that is, who  have left their  posts. This is the same as on  leave No salary  In the list  of employees select those  employees that your department  wants  to  employ,  and  click  “Add”  button,  and  then  those  selected  employees will be added into your department.  In  the  box  of Our  Department’s  Employees  select  those  employees  that will leave  your  department, and  click  “Remove”  button,  and  the  select employees will leave your department (leave their posts).  After  operations, click  “Close”  button  or  to  return to  Department  Management main Window


ย้อนกลับ กลับสู่เมนูหลัก ถัดไป